Air conditioners play a critical role in maintaining comfort, especially during warmer months. However, like any complex system, they are prone to issues that can reduce their efficiency or even lead to breakdowns. Below is a detailed guide covering the ten most common air conditioner problems and actionable steps to address them effectively.
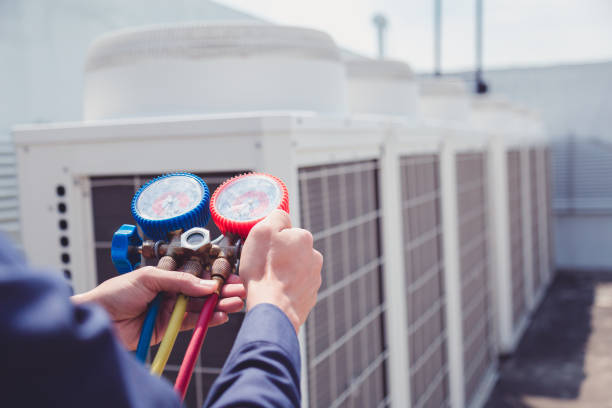
1. Refrigerant Leaks
Refrigerant is essential for cooling your home, but leaks can cause the system to underperform or stop working altogether.
How to Address: – Check for signs of leaks, such as hissing noises or reduced cooling efficiency. – Hire a professional HVAC technician to identify and fix the leak. – Ensure refrigerant levels are restored according to manufacturer specifications.
2. Faulty Thermostats
If your thermostat is malfunctioning, it may lead to incorrect temperature settings or prevent your AC from turning on/off efficiently.
How to Address: – Replace batteries in manual thermostats. – Recalibrate or upgrade older thermostats with programmable or smart thermostat models. – Verify wiring connections if using wired thermostats.
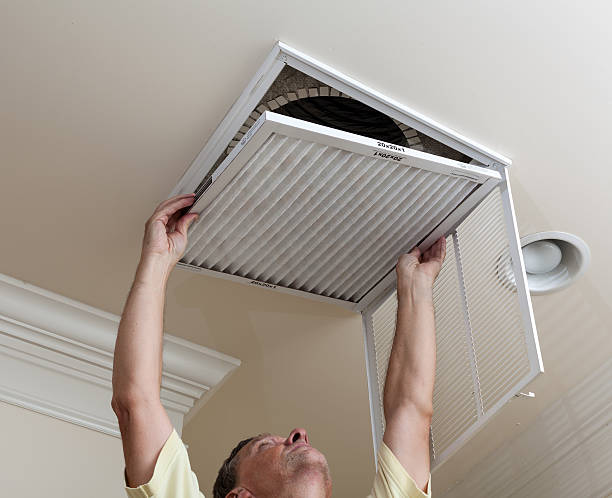
3. Clogged Air Filters
Dirty air filters restrict airflow and reduce cooling efficiency while increasing energy consumption. How to Address: – Inspect air filters monthly during peak usage seasons. – Replace disposable filters every 1–3 months based on usage and environmental conditions. – Clean reusable filters as per the manufacturer’s guidelines.
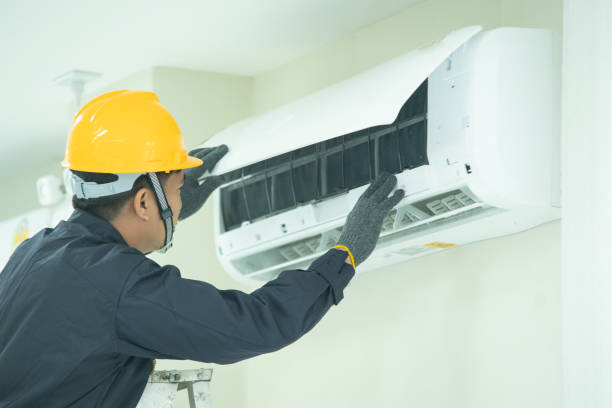
4. Frozen Evaporator Coils
Evaporator coils may freeze if airflow is restricted or refrigerant levels are low. This often results in reduced cooling capacity. How to Address: – Turn off the unit immediately if you notice ice buildup. – Check and replace dirty air filters that may be limiting airflow. – Ensure regular maintenance by an HVAC professional.
5. Dirty Condenser Coils
Condenser coils located outside can collect dirt and debris over time, reducing heat transfer efficiency and overworking the system. How to Address: – Regularly inspect condenser coils for dirt buildup during routine maintenance checks. – Use a soft brush or coil cleaner spray specifically designed for AC systems.
| Maintenance Task | Frequency |
| Inspect condenser coils | Monthly (spring/summer) |
| Deep clean condenser coils | Every 6–12 months |
6. Electrical Control Failures
Frequent cycling of your AC unit can wear out electrical contacts and connections over time.
How to Address: – Schedule regular inspections for electrical components such as relays, capacitors, and contactors with an HVAC technician.
7. Water Leaks Inside the Unit
Blocked drainage systems or damaged drain pans can cause water leakage inside your home. How to Address: – Clear clogged condensate drain lines using a wet/dry vacuum or a plumber’s snake tool. – Replace rusted or cracked drain pans promptly.
8. Strange Noises From Your Unit
Unusual noises like banging, rattling, or squealing may indicate loose components, motor issues, or ductwork problems. How to Address: – Tighten loose parts if accessible safely with tools like screwdrivers. – Lubricate moving parts such as fans (if applicable). – Consult professionals for motor-related repairs.
9. Poor Airflow Distribution
Inconsistent airflow could be caused by blocked vents, ductwork leaks, or undersized systems struggling under load demands.
How to Address: 1. Open all supply/return vents in rooms where airflow seems weak; avoid blocking them with furniture/drapes too close by accident!,
How Refrigerant Leaks Affect Your AC Service Orlando System
Refrigerant leaks are one of the most persistent and problematic issues that can affect the efficiency and performance of your air conditioning system. The refrigerant is a key component in cooling your home, as it facilitates heat exchange by absorbing and releasing heat. When a leak occurs, it compromises this process, leading to reduced cooling performance and increased energy consumption. Below is an in-depth guide to understanding refrigerant leaks, their causes, signs, and effective solutions.
Common Causes of Refrigerant Leaks
- Corrosion: Over time, the copper tubing in your AC system may corrode due to exposure to formic acid or other environmental factors.
- Manufacturing Defects: Faulty components or poor assembly during manufacturing can lead to leaks.
- Wear and Tear: Regular wear over years of use can weaken joints or seals within the system.
- Improper Installation: If the AC unit was not installed correctly, it increases the risk of premature leaks.
Signs of a Refrigerant Leak
- Reduced Cooling Efficiency: If your AC struggles to maintain a consistent temperature or cools less effectively than before.
- Hissing Sounds: A hissing or bubbling noise from the unit often indicates escaping refrigerant gas.
- Ice Build-Up on Coils: Low refrigerant levels can cause freezing on evaporator coils due to improper heat absorption.
- Higher Energy Bills: A leak forces the AC to work harder than usual, resulting in increased energy consumption.
- Unusual Odors: In some cases, leaking refrigerants may emit chemical-like odors.
The Environmental Impact of Refrigerant Leaks
Refrigerants such as hydrofluorocarbons (HFCs) are harmful when released into the atmosphere as they contribute significantly to global warming. Older systems using chlorofluorocarbon (CFC) or hydrochlorofluorocarbon (HCFC) refrigerants like R-22 have an even greater environmental impact due to their ozone-depleting properties.
Steps for Resolving Refrigerant Leaks
Addressing refrigerant leaks requires professional attention because handling this substance involves safety regulations and technical expertise.
1. Perform Diagnostic Tests
Qualified technicians use specialized tools such as electronic leak detectors or UV dye kits to pinpoint the exact location of leaks within the system.
2. Repair or Replace Damaged Components
Depending on where the leak originates, technicians may repair or replace faulty components like tubing, connectors, or valves.
3. Recharge Refrigerant Levels
Once repairs are performed, your AC unit will need a proper recharge with refrigerants compatible with its design specifications (e.g., R-410A).
| Refrigerant Type | Compatibility Notes |
| R-22 | Phased out; replacement recommended |
| R-410A | Common in newer systems; eco-friendly |
4. Prevent Future Leaks
Preventative maintenance programs can help avoid future issues by ensuring regular inspection of coils, connections, and other critical parts.
Long-Term Solutions
If your air conditioner frequently experiences refrigerant leaks despite repeated repairs, consider upgrading to a newer model that uses environmentally friendly refrigerants such as R-32 or R-410A. Modern systems are built with enhanced durability features designed to minimize common leakage points.
By identifying signs early and taking immediate action, homeowners can extend their AC’s lifespan while avoiding costly inefficiencies caused by low refrigerant levels. Regular servicing by certified professionals also ensures compliance with environmental standards while keeping your cooling system performing optimally year-round.
Detecting and Resolving Faulty Thermostat Issues with Expert Orlando, FL AC Repair
A thermostat is a critical component of your air conditioning (AC) system, acting as the control center that regulates temperature and ensures your unit operates efficiently. However, when a thermostat malfunctions, it can lead to inconsistent cooling, higher energy bills, or even complete system failure. Detecting and resolving faulty thermostat issues in your AC unit is essential for maintaining comfort and efficiency. Below is a detailed guide on identifying problems and addressing them effectively.
Signs of a Faulty Thermostat
- Inconsistent Temperatures: Rooms may feel too warm or too cold compared to the set temperature.
- Unresponsive Controls: The thermostat does not respond when you adjust the settings.
- Short Cycling: The AC turns on and off frequently without completing a full cooling cycle.
- Display Issues: A blank or flickering display on digital thermostats could indicate power or connection problems.
- Constant Running: The AC runs continuously without shutting off, leading to unnecessary energy consumption.
Steps to Detect Issues
- Ensure that batteries are not drained (for battery-operated thermostats).
- Verify that the unit is properly connected to its power supply.
- Open the thermostat cover and inspect internal wiring for loose or corroded connections.
- Look for frayed wires that might interfere with communication between components.
- Use an external thermometer to compare room temperature against your thermostat’s reading.
- Significant discrepancies are often indicative of calibration issues.
- Ensure the thermostat isn’t exposed to direct sunlight, drafts, or heat sources that can distort its readings.
- Switch between modes (cooling/heating/off) to check if the system responds appropriately.
Resolving Faulty Thermostat Issues
| Problem | Solution |
| Dead Batteries | Replace batteries with fresh ones compatible with your device. |
| Loose/Cut Wires | Secure loose connections or replace damaged wires if necessary. |
| Calibration Errors | Recalibrate using manufacturer guidelines or consult a professional HVAC technician for assistance. |
| Outdated Thermostat Model | Upgrade to a modern programmable or smart thermostat for better performance and functionality. |
| Poor Placement | Relocate the device away from heat sources or windows affecting its accuracy. |
When to Call a Professional
- Persistent short cycling after troubleshooting
- Advanced electrical repairs beyond simple wire adjustments
- Replacing an outdated or incompatible thermostat
- acserviceorlando.net
Preventive Measures
- Schedule annual maintenance checks with an HVAC technician.
- Regularly clean dust buildup around and inside thermostats using mild cleaning tools.
- Consider upgrading older models to smart thermostats offering advanced diagnostics.
By addressing faulty thermostats proactively, homeowners can ensure their AC units operate optimally while enhancing energy efficiency and indoor comfort levels throughout all seasons.
Understanding Frozen Evaporator Coils and How to Handle Air Conditioning Repair Orlando, FL
Frozen evaporator coils are a common issue that can significantly hamper the performance of your air conditioning system. Understanding what causes this problem and learning how to address it is crucial to maintaining the efficiency and longevity of your AC unit.
Causes of Frozen Evaporator Coils
- Restricted Airflow
Inadequate airflow over the evaporator coils reduces heat transfer, causing condensation to freeze. This can be caused by: - Clogged or dirty air filters
- Blocked vents or registers
- Malfunctioning fans
- Low Refrigerant Levels
Insufficient refrigerant reduces pressure within the system, leading to lower temperatures on the evaporator coil surface. This often results from: - Refrigerant leaks
- Improper refrigerant charge during installation
- System Malfunctions
Certain mechanical or electrical issues can lead to frozen coils, including: - Faulty blower motors or fan relays
- Thermostat issues causing improper cycling of the system
- Outdoor Temperatures
Running your AC when outdoor temperatures are too low (typically below 60°F) can cause freezing due to reduced cooling demand.
Solutions for Frozen Evaporator Coils
- Turn Off the AC Unit
Prevent further damage by switching off your air conditioner if you notice ice buildup on the coils. Allow the ice to thaw completely before proceeding. - Check and Replace Air Filters
Inspect air filters for dirt and debris. Replace them if they appear clogged to restore proper airflow. - Ensure Unobstructed Vents and Registers
Remove any furniture, curtains, or objects blocking airflow from vents and registers. - Inspect Refrigerant Levels
Have a licensed HVAC technician check refrigerant levels in your system. If low levels are detected, they can locate leaks, recharge the refrigerant, and ensure proper pressure levels. - Examine System Components for Faults
A professional should inspect components like blower motors, fan blades, or thermostats for potential malfunctions that disrupt airflow or cycle timing. - Schedule Regular Maintenance
Routine maintenance ensures that potential issues such as dirt buildup on coils or low refrigerant levels are addressed before they escalate into major problems.
Preventative Measures
| Maintenance Task | Frequency | Purpose |
| Replace air filters | Every 1–3 months | Maintain proper airflow |
| Clean condenser coils | Annually | Improve heat transfer efficiency |
| Schedule professional tune-ups | Biannually | Detect potential issues early |
By addressing these factors proactively, you can avoid disruptions caused by frozen evaporator coils while ensuring optimal performance of your air conditioning system year-round. Proper care not only extends equipment lifespan but also improves energy efficiency—saving you money over time.
Dirty Condenser Coils: Why They Matter and How They Can Affect Your AC’s Performance
Dirty condenser coils are one of the most frequent issues affecting the efficiency and performance of air conditioning systems. These coils, typically located in the outdoor unit, play a vital role in releasing heat absorbed from your indoor space to the outside environment. When they become dirty or clogged with debris, their ability to transfer heat is significantly reduced, leading to various complications.
Why Do Dirty Condenser Coils Matter?
- Reduced Energy Efficiency
When condenser coils are covered in dirt, dust, or grime, they struggle to release heat effectively. This forces your AC system to work harder and consume more energy to achieve the desired indoor temperature. - Increased Wear and Tear
The extra strain on your system caused by dirty coils accelerates wear and tear on key components such as the compressor. Over time, this can lead to costly repairs or even premature system failure. - Decline in Cooling Performance
Dirty condenser coils hinder airflow and compromise the cooling capacity of your AC unit. As a result, you may notice uneven temperatures or difficulty in achieving adequate cooling throughout your home. - Higher Utility Bills
An air conditioner with dirty condenser coils requires more power to operate efficiently. This translates into increased energy consumption and higher electricity bills.
Signs Your Condenser Coils May Be Dirty
- Higher-than-usual energy bills without an increase in usage
- Reduced cooling efficiency or uneven room temperatures
- The outdoor unit running longer than normal cycles
- Visible dirt buildup on the external part of the outdoor unit
How Dirt Accumulates on Condenser Coils
| Cause | Description |
| Outdoor Environment | Dust, pollen, grass clippings, and other debris from surroundings can settle on the outdoor unit. |
| Neglecting Maintenance | Lack of routine cleaning or servicing allows dirt to accumulate over time. |
| Proximity to Plants | Shrubs and trees near the outdoor unit shed leaves that can clog up components like the coil. |
Steps for Cleaning Dirty Condenser Coils
- Turn Off Power: Always disconnect power before performing any maintenance tasks on your AC system for safety purposes.
- Inspect Coils: Remove any large debris like leaves or twigs surrounding the outdoor unit.
- Use a Coil Cleaner: Apply a commercial coil cleaner specifically designed for HVAC systems following manufacturer guidelines.
- Rinse Gently: Use a garden hose with low pressure to rinse off loosened dirt from top to bottom.
- Schedule Professional Maintenance (if needed): For heavy buildup or deep cleaning needs, contact an HVAC professional who has specialized tools.
Preventive Tips for Keeping Coils Clean
To minimize future problems caused by dirty condenser coils: – Schedule regular maintenance at least twice a year. – Keep plants trimmed at least 2-3 feet away from your outdoor unit. – Install a protective cover during off-seasons when your AC is not in use. – Check filters regularly as clogged filters can exacerbate stress on other components like condenser coils.
Addressing dirty condenser coil issues promptly can extend the longevity of your air conditioning system while ensuring efficient operation throughout its lifespan.
Water Leaks Inside Your AC Unit: Key Causes and Effective Solutions
Water leaks inside your air conditioning system can lead to serious problems, including water damage, reduced efficiency, and even electrical hazards. Addressing these leaks promptly is essential to maintaining the functionality and longevity of your AC unit. Below are the common causes of water leaks and effective solutions to resolve them.
Common Causes of Water Leaks in AC Units
- The condensate drain line is responsible for removing excess moisture from your AC system. Over time, this line can become clogged with dirt, dust, or algae.
- A clogged drain line prevents proper drainage, causing water to back up and leak into your home.
- When air filters become dirty or clogged, they restrict airflow over the evaporator coil.
- This can cause the coil to freeze, and when it melts, excessive water may overwhelm the drainage system.
- An improperly installed AC unit may not be level or aligned correctly.
- If the unit tilts in one direction, it can disrupt proper water flow towards the drain pan.
- The drain pan collects condensation before it drains out of your system.
- Over time, wear and tear or rusting can cause cracks in the pan, leading to leaks.
- Insufficient refrigerant levels can cause the evaporator coil to freeze.
- As with dirty air filters, when this ice melts it creates excessive water that may leak if not properly handled.
- In humid climates, an AC will naturally collect more moisture.
- If your unit isn’t designed for high humidity levels or lacks proper maintenance, it could leak due to excessive condensation buildup.
Effective Solutions for Water Leaks
- Unclogging the Condensate Drain Line:
Use a wet/dry vacuum or a plumber’s snake to remove any blockages in the drain line. Regularly cleaning this line helps prevent future clogs. - Replacing Air Filters:
Replace dirty filters every 1-3 months depending on usage and environmental factors. Clean filters ensure proper airflow over the evaporator coils. - Leveling Your Unit:
Check if your AC unit is properly installed on a flat surface. Adjust its positioning to ensure water flows directly into the drain pan without pooling in other areas. - Repairing or Replacing a Damaged Drain Pan:
Inspect your drain pan for cracks or rust spots regularly. Replace it if damaged beyond repair to ensure efficient drainage. - Checking Refrigerant Levels:
Contact a licensed HVAC technician to inspect refrigerant levels and recharge them if necessary. This helps prevent freezing issues with evaporator coils. - Installing a Secondary Drain Pan:
For systems prone to frequent leaks due to high humidity levels or other factors, consider installing a secondary drain pan underneath your AC unit as an additional safeguard against water damage.
Preventative Maintenance Tips
- Schedule annual professional maintenance for your air conditioner.
- Flush out condensate lines during each service visit.
- Inspect all components regularly for wear and tear.
- Monitor humidity levels indoors; consider using dehumidifiers if needed.
- Keep outdoor condenser units free from debris accumulation that could impact performance.
| Problem | Solution | Frequency of Check |
| Clogged condensate line | Clean with vacuum/flush solution | Every 6 months |
| Dirty air filter | Replace regularly | Monthly/Quarterly |
| Damaged drain pan | Inspect & replace as needed | Annually |
By addressing potential causes early on and performing regular maintenance tasks as listed above, you can significantly reduce the risk of costly repairs caused by water leaks inside your AC unit while ensuring optimal performance year-round.
- 10 Most Common Air Conditioner Problems and How an HVAC Company in Orlando, FL Can Help
- Prioritize Your Orlando, FL AC Repair to Avoid Expensive Issues
- How Often Should You Schedule Orlando, FL AC Repair for Optimal Performance
- Ensuring Longevity and Efficiency with Orlando, FL AC Repair
- How Often Should You Schedule Orlando, FL AC Repair to Keep Your System Running Smoothly
- When Should You Schedule Orlando, FL AC Repair for Optimal Performance
- Top 5 Reasons to Seek Professional Orlando, FL AC Repair for Your Air Conditioning Unit
- Top Signs You Need Immediate Orlando, FL AC Repair for Your Cooling System
- When AC Trouble Is Urgent: Recognizing Emergency HVAC Warning Signs That Require Immediate Attention